Robot Hardware Explanation
Script
What does the Hardware Do?
The hardware allows for power to be directed to all facets of the robot. By providing power, our robot actually moves. It is important for hardware to be clean and efficient, to allow for a quicker software integration. It is also important to ensure port mappings are cleanly drawn out, so that software needn’t struggle with getting stuff mixed up
Components of our Control System (CS)
- Raspberry Pi
- DROK 160D Dual H Bridge
- Jumper Cables
- GPIO extension cable
How Everything is Wired
The primary connections, since we aren’t using any other connectors or external components, are simply the Dual H Bridge, being powered by the raspberry pi. The Dual H Bridge is also connected to each of the two motors, and by doing so are powering each of the motors. Each of the pins is connected via ENA/ENB, and also by in1-4 pins which are used to control the direction and voltage of each of the motors. By doing this, we are able to control movement and speed of the robot.
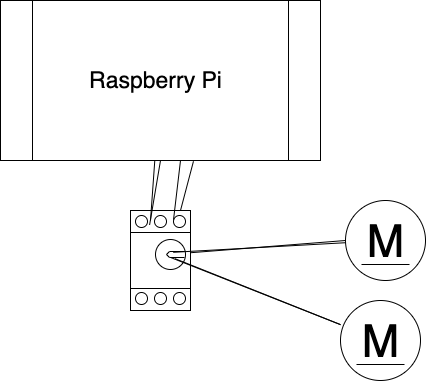 Diagram of how the raspberry Pi Wiring would turn out, using the dual h motor bridge and connected wires. Rather simple!
Issues?
Were there any issues? Definitely. Many of the dual H bridges we were eyeing had very poor documentation, so we just went with one and fished around for it. Similarly, it was tough to try and fit all of the electronics on to the board, as many parts of it were rather big. In hindsight, it would have been better to possibly get something oriented towards a motor controller over a dual h bridge, due to the better documentation.